Tag: Vehicle Specifications

CASE_590_SN_Backhoe-Web.jpg

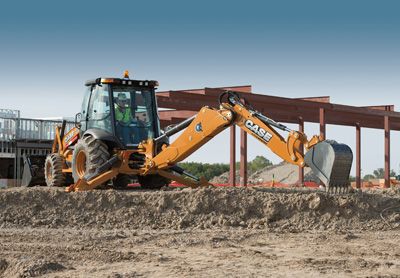
3-Point Checklist for Spec’ing the Right Backhoe

A backhoe is not likely to be the asset most often purchased for a utility company’s fleet. For example, Duke Energy – which has more than 15,000 fleet assets – “may only purchase three or four a year,” said Chris Jolly, Duke’s director of regional operations for Carolinas West.

That means a purchaser may not be as familiar with the required specs for a backhoe as he or she may be with, say, the specs for a standard pickup truck used by the utility.

But it is just as important to get the specs right, said Eric Zieser, NAFTA product manager for backhoes at CASE Construction Equipment. “Buyers really do need to understand their entire fleet and how a backhoe plays into it. By under-specifying a machine, you may actually be creating more work and cost for yourself in the future by having to bring in/rent/transport additional equipment to do the job.”

So, when spec’ing the next backhoe for your fleet, keep these three points in mind.

1. Know what you need.
At Duke Energy, an acquisition team works closely with crews in the field, despite having a corporate agreement with one manufacturer for a standard backhoe, according to Jolly. Even with that standard equipment, there are options.

“Listen to your customers and work closely with the manufacturer. They’ve got the history of what the product can do,” Jolly said.

And skip the idea that a bigger engine or greater dig depth is always the answer. Zieser points out that large backhoes provide greater digging depth and power, but their size may limit their access to worksites. In addition, wide tracks may provide more stability yet may be more difficult to transport. “That’s why it’s so important for backhoe buyers to understand their application – and how that backhoe fits into the overall flow of their fleet,” Zieser said.

2. Consider more than price.
While price is certainly an important consideration, utility also must be factored into the equation when spec’ing a backhoe. “Not understanding how that backhoe will be utilized and optimizing the asset to its greatest potential can be even more costly,” Zieser said.

He points to the option of auxiliary hydraulics as an example. “By not adding greater auxiliary hydraulic options to a backhoe, will you now have to bring in other machines to operate certain attachments and perform certain tasks?”

Even with the standard backhoe configuration, Duke Energy permits an integrated tool package to be added, which allows the bucket to be changed out for forks. “It makes the unit a little more versatile,” Jolly said.

Warranty, preventive maintenance and ongoing upkeep also must be considered during the spec’ing process, Zieser said. “Each manufacturer has its own warranty and conditions. It’s important to understand that, and to understand how the local dealer representative works with you to carry out the terms of that warranty.”

In terms of maintenance, Zieser points to CASE’s SiteWatch telematics, which monitors equipment performance and tracks engine hours to ensure maintenance is done on time.

3. Enhance safety features and operator comfort.
Clearly, utility fleet managers have a number of items to consider when spec’ing backhoes, and operator comfort is one that cannot be forgotten. At Duke, Jolly said that could include allowing some modifications based on operator desires. Florida backhoe operators may want an open cab with a fan while those in the Midwest may prefer a closed cab.

Safety also is important, and Duke is always on the lookout for new enhancements. Jolly said manufacturers are open to input about safety features that utility fleets would like to see, such as the inclusion of ladders on the side of bulldozers, which is something Duke discussed with Caterpillar. “Now we can spec and order that,” Jolly said.

Ultimately, an important key to a strong backhoe spec may be reaching out to other utility fleet professionals, Jolly said. “Don’t hesitate to call on other utilities to ask what our experience has been and how things are working for us. We’re open to share that type of information to help others out.”

About the Author: Sandy Smith is a freelance writer and editor based in Nashville, Tenn.

*****

Key Questions to Ask
Eric Zieser, NAFTA product manager for backhoes for CASE Construction Equipment, suggests that fleet managers ask the following questions in order to select the best backhoe for their operation.

1. How will the backhoe be transported? Your current trailer may determine the backhoe size – or bring the added costs of buying a new trailer.

2. What is the anticipated digging depth? Zieser recommends going beyond your average operating conditions to ensure you can tackle typical jobs that come your way.

3. What types of auxiliary hydraulics are needed? “If you are running multiple attachments, a combination hydraulics setup is ideal, as owners can then switch back and forth between unidirectional and bidirectional, as needed,” Zieser said.

UFP-Article-Pic4-Web.jpg

Spec’ing Step Vans for Utility Fleet Applications

Step vans have become a popular vehicle option for utility fleets, offering distinct safety and productivity advantages over traditional service bodies.

With a step van, the driver can quickly enter from or exit onto the curbside, staying a safe distance from vehicle traffic on the road. Curbside entry and exit are also more ergonomically friendly for drivers, who may make 30 to 60 stops each day. The cab door design on step vans offers advantages, too. While traditional commercial vehicles are built with swing-out driver and passenger doors, a step van’s sliding doors allow the driver to more easily move in and out of the vehicle with materials or tools in hand. Here, sound ergonomics influence productivity and drive down costs.

In contrast to service bodies, step vans are built from a bare chassis, with cabs that allow full access to the cargo area. Some also have side cargo access doors, and nearly all step vans allow outside cargo entry from rear roll-up or hinged doors. This means that service tools and materials are easier to get to, which ultimately results in faster service calls.

To reduce weight and eliminate corrosion, step vans are constructed with aluminum sheet and extrusions. Fleet managers can expect these durable vehicles to provide a service life in excess of 15 years.

Another feature of step vans is that because they are highly customizable, with various interior configurations and workspaces available, configuring a mission- or company-specific solution is easy and economical. And, a full-height cab and cargo area, with inside storage, allows drivers to use the vehicle as either a mobile office or prep space for outdoor work.

Step Van Options
The high degree of customization offered by step vans may be overwhelming for those accustomed to a “take it or leave it” product. If you want the convenience of sourcing a complete van from a single supplier, be sure to choose a vendor that can supply you with all of the vehicle’s features, rather than just the chassis and body. The following list details the key choices you will need to make when spec’ing a step van.

Gas or diesel? While a gas engine offers a lower initial cost, as well as lower fuel and maintenance costs, diesel engines offer greater fuel efficiency, longevity and hauling capacity. Ford offers a gas-only chassis designed for light- to medium-duty use. Freightliner offers gas or diesel and can handle heavier-duty jobs.

Interior configuration. Interior storage and workspaces can be configured to fit closely with the needs of the specific application. Storage can include shelving, bins, cabinets and drawer units.

Exterior storage. This type of storage can be configured to accommodate a range of equipment, including generators, jackhammers and propane tanks.

Lighting. Today, brighter, more efficient and longer-lasting LEDs are rapidly displacing halogen and incandescent lighting. Exterior lighting options for step vans include illumination of the work area for nighttime operations as well as warning lights for vehicles that operate in high-traffic areas. Interior lighting can be arranged to complement interior storage and workspaces.

Safety options. Multiple points of contact – in the form of grab rails – offer safer and more ergonomic entry and exit, and blind-spot and rear-view cameras provide 360-degree visibility, improving the step van driver’s ability to safely change lanes and operate in reverse.

Application-specific options. Task-specific options can include PTO air compressors, hydraulic tool circuits and work-site fresh air climate control.

The step van has come a long way since the early days of the milk truck. If you like the idea of a vehicle that offers improved ergonomics, greater efficiency for frequent entry and exit, and configuration flexibility to serve a wide variety of applications, the step van may be a perfect fit for your fleet.

About the Author: Jason Yunck is business development manager for the industrial and utility segment at Utilimaster (www.utilimaster.com), a leading manufacturer of walk-in vans and commercial truck bodies for the delivery and service marketplace.

*****

Start With Your Needs and the Spec Will Follow
When you search for the right step van, consider the capabilities of your vendor. Do they supply a turnkey solution or just the chassis and body? Do they have a dedicated production line for step vans? Do they have a team focused on the utility market?

If you want a van that precisely fits your needs, find a vendor that listens first, rather than pushes a preconfigured vehicle. To help you prepare for vendor discussions, use this van selection questionnaire to help define your requirements.
• How many times will the driver or crew be in and out of the van each day?
• Will the crew work at night and need to illuminate the exterior work area?
• On average, how many miles will the van be driven per year?
• Is there a preference for gas, diesel, an alternative fuel source or a plug-in hybrid?
• In what weather conditions will the van be operated? Is there a need for a climate-controlled interior workspace?
• What kind of work will be done inside the van? What type and size of equipment needs to be stored?
• How many passengers must be accommodated? Most vans will accommodate one to five people.
• Is onboard AC power – 120 volts or 240 volts – needed?
• Will the vehicle be used in high-traffic areas? If so, warning lights will be required.

Top-Controls-011-Web.jpg

Important Considerations When Spec’ing Lift Controls

The lift control panel on an aerial device is an important element for effectively running the unit, enabling the working platform to be propelled into a desired location. Similar to how a steering wheel gives a truck-mounted aerial device mobility to get to and from a job site, the lift control panel gives the machine’s operators the ability to quickly and easily position the platform into the work area.

But because the operator control station is relatively small, it’s not always top of mind when new units are being spec’d. Given the importance of lift controls on aerial devices, however, following are some insights to consider when spec’ing them.

The foundation of every control panel is the ability for operators to use it to control the aerial device’s vertical longitudinal (or extend-and-retract) and rotational (or side-to-side) movements. For instance, most aerial device control stations are equipped with a single joystick. The joystick is designed to give operators control of the machine’s boom functions from one handle. “A common industry standard on an aerial device’s lift control panel is a three-function joystick,” said Dan Brenden, director of engineering for Terex Utilities (www.terex.com/utilities). “This type of joystick allows operators to move the individual booms up and down, as well as to rotate the unit.”

Four-function single joysticks are available as an option. This type of joystick enables operators to extend and retract the boom on articulating models, or it can operate elevator sections, if equipped, giving users even more control and functionality from one joystick. According to Brenden, “Terex uses similar single joystick designs across its entire aerial device product line, keeping uniformity within the brand, so from the smallest to largest machines, all controls function the same for the operator.”

Control stations may also include the ability to control platform/basket movements. This feature elevates the platform, regardless of the boom’s position, allowing operators to gain several feet of working height to access hard-to-reach work areas. The operator’s ability to control the speed of the functions can also be located on the control station. Brenden mentioned that Terex offers a two-speed control option.

Air-operated chassis engine stop and start plungers are an option at the platform, allowing operators to quickly and easily turn the chassis engine on or off. Control stations are also equipped with an enable lever, which provides operators protection against inadvertent operation. According to Brenden, the enable lever must be actuated, in combination with the lift control movement, before any platform movement is allowed.

The type and arrangement of an aerial device’s lift control panels can vary from platform to platform, and from manufacturer to manufacturer. Additional functionality and control options on a lift control panel will depend on the machine’s specific options. “For example, if the machine has a basic jib, the lift controls will include functions for winch and jib articulation,” Brenden said. “If the machine is equipped with a hydraulic extend jib, that adds the need for more controls. The more options an aerial device has, the more controls needed.”

About the Author: Amber Reed is a consultant for Signature Style PR + Marketing, based in Huntersville, N.C.

*****

Safety Features on Lift Controls
An aerial device’s lift functions are controlled by the operator, either in the platform or at the control station at the base of the unit, said Dan Brenden, director of engineering for Terex Utilities. All aerial devices are fitted with controls in both locations.

Safety is of utmost importance when operating an aerial device. Every device is outfitted with a lower control station at the base of the machine that overrides the platform controls. This offers several benefits, including the ability to lower the lift if an operator, working at height, becomes unable to operate the controls. There is also a control option that allows the operator and unit to be safely lowered in the event of an equipment power failure.

Nonmetallic control handles are another standard safety feature on a control panel. The single joystick is dielectrically tested and may provide limited secondary protection between the metallic components of the boom tip and handle. “It is important to note that this handle is not rated for electrical protection, although it may provide limited secondary protection from incidental contact,” Brenden said. “It is not intended to replace safe work practices or primary protection, such as maintaining distance, cover-up and personal protection equipment.”

Hydratrek-1-Web.jpg

Spec’ing All-Terrain Utility Vehicles for Maximum Safety

All-terrain utility vehicles (UVs) are machines used by utility fleets to transport people, materials and equipment across potentially hazardous off-road environments to inspect or repair power lines or perform other tasks in remote areas. These vehicles go where four-wheel-drive pickups cannot, navigating steep slopes, trudging through heavy brush, hovering over swamplands or even floating and powering across creeks and rivers, depending on the make and model of the UV.

If the UV is not designed for the ground conditions of a particular job, you risk having crews stranded in a hard-to-reach area or, worse, injured from a rollover, debris falling onto the cab or unsecured cargo flying into the cab.

So, how should you spec your next UV to ensure the maximum safety of your crews in off-road environments? Keep these five points in mind.

1. Terrain
What type of terrains will this UV need to handle? What degree of slopes? Will it encounter marshes or swamps? What about deep water? These questions are fundamental to selecting the right machine for the job and ensuring the safety of your crews.

Take, for example, UVs that use track systems instead of wheels. The type of terrain directly impacts the track size you should select.

Craig Simonton, director of sales operations for Hydratrek Inc. (www.hydratrek.com), a manufacturer of amphibious UVs, said the standard track on the company’s smaller machines, such as the XT66 model, is 16 inches. But if the UV is expected to operate primarily in swamp and wetland conditions, he recommended that fleet managers spec the larger 20-inch track to further reduce ground pressure, so that the machine can essentially hover on top of the muddy surface and avoid getting bogged down.

When it comes to ground pressure, the principle at work is this: The wider the UV’s track, the lighter the machine’s overall footprint because its weight is spread across a larger surface area.

“Track size can be the difference of successfully getting out to the job site or not,” Simonton said. “If you don’t have a light footprint on marsh, swamps and wetlands, there’s a good chance that you’re going to get stuck. Then you have to deploy more people and equipment to try to recover the vehicle.”

Slope angles are also important to factor into your specification, including sidehill, uphill/downhill, approach and departure angles to prevent rollover risk. For example, the Prinoth Panther series tracked vehicle allows for a maximum sidehill slope of 40 percent (22 degrees) and incline/decline of 60 percent (31 degrees).

But how can you ensure that your crews operate the machine within the manufacturer’s allowable parameters? Bill York, sales manager for Prinoth LLC (www.prinoth.com), recommended adding an inclinometer to the machine’s specifications. “With the inclinometer, if the machine exceeds the maximum percent or degree of slope, then an alarm goes off and the operator can adjust course to take a safer route.”

2. Speed
This is primarily a consideration for spec’ing UVs with wheels, which are inherently faster than tracked vehicles that are designed to operate at relatively low speeds between 6 mph and 14 mph.

If you need to ensure that drivers operate the UV within a certain speed, Jim Blaze, national accounts manager for Polaris Industries (www.polaris.com), advised that fleet managers should consider a speed-limiting option that caps speed at 25 mph.

Blaze also recommended three-point safety harnesses in higher-speed UVs, instead of lap belts. “[Polaris] puts shock absorbers on safety harnesses because, in remote areas, where the ride can get real bouncy at higher speeds, the shock absorbers can help protect you from dislocating your shoulders.”

3. Visibility
“It’s important to get as close to 360-degree visibility as possible,” York said. “Sometimes that can be done by using mirrors. But often, when you have equipment [such as a digger derrick] mounted on the machine, the mirrors aren’t enough because the equipment gets in the way.”

One solution is to add cameras, York said. “I’ve seen vehicles built with as many as four cameras on them for all directions. And the cameras feed into a single screen in the cab, giving the operator maximum visibility to navigate the vehicle around hazardous conditions.”

Lighting is also an important consideration. “There are quite a few work area light and warning beacon options you should consider,” York said. “But at a minimum, you want good forward and backward lighting because if you can’t clearly see your surroundings at night, that can create a problem.”

With smaller, higher-speed wheeled UVs, Blaze suggested adding a windshield, either made out of polycarbonate – the less expensive option – or safety glass.

“If you’re going 25 mph across 30 miles of terrain, and the wind is blowing on your face the entire time, it would make sense to put a windshield up front,” he said.

When would you choose safety glass over the polycarbonate windshield?

“One example is if you’re running the machine around nuclear plants or power distribution centers for security purposes,” Blaze said. “In that application, you would want maximum visibility, especially in inclement weather. And that requires windshield wipers, which work well with the glass windshield but would scratch the polycarbonate. So, in that instance, you would choose the glass.”

4. Cab Protection
You expect crews to avoid rollover situations. But if the UV happens to tip over, is the cab strong enough to protect your people? That’s where rollover protective structure (ROPS) certification comes into play.

“Make sure the cab is ROPS certified to the highest standard in the world – ISO 3471,” York advised.

For higher-speed UV applications, Blaze recommended adding a “headache rack,” which is essentially a mesh system installed at the rear of the cab to keep cargo from sliding forward and injuring the crew.

5. Onboard Safety Equipment
These are the options you hope you don’t have to use, but they’re available just in case.

“You want to make sure that when operators go onto various terrains, that they have a way out,” York said. “If they go into a swamp, how are they going to get out? What is the backup plan if they can’t? Think this through. Do they have survival gear with them?”

Some of the gear to consider includes an onboard fire extinguisher, life vests for amphibious UVs and a recovery winch.

“Because of the nature of the vehicle, having a winch is very important,” Simonton said. “Sometimes the farther you can go, the tougher the environment gets, and you can get stuck. It’s always best to ensure your utility vehicle is equipped with a winch so you have the ability to get out of tough situations when you need it.”

The Bottom Line
When crews are sent to do a job in an all-terrain UV, they know that they’ll likely encounter hazardous conditions. So, equip them with a machine that gives them confidence and peace of mind that they can do their job with maximum safety and productivity.

Terex 2 Web

Spec’ing Digger Derricks for Maximum Productivity

A truck-mounted digger derrick is designed to enable utility companies to dig holes and set poles for electric power transmission and distribution systems.

In an ideal scenario, the derrick should be able to perform both functions – digging and lifting – without your crew having to reposition the truck. This way, your team can get more jobs done in less time, improving service to customers and bolstering your bottom line.

“If you select a derrick that’s too small for the job, you might be able to dig a hole from a certain position. But when you want to set the pole, the load capacity at the truck’s current position might not be sufficient to lift the pole,” said Jon Promersberger, engineer, new product development for Terex Utilities (www.terex.com), a global manufacturer of aerial work platforms and digger derricks. “So you have to move the truck to achieve the proper boom angle and lift capacity to do the job, which wastes a lot of time. If you’re going to dig your hole at 20 feet from the truck, you want to spec the derrick to allow you to also set the pole at 20 feet.”

But with a wide range of weight capacities, boom lengths and other factors to consider, how do you determine the right spec for your application?

Derrick Terminology
Begin by gaining a working knowledge of some of the key terms the industry has used to describe a derrick’s capabilities.

Maximum Capacity
This has been the historic metric for classifying derricks, defined as the maximum lifting capacity when the boom is fully retracted at its highest angle.

“Basically, maximum capacity is what’s measured when the boom is straight up in the air. If you had to lift something that’s heavy, and the boom is real close to the truck, it would tell the derrick’s capability in performing that function at that angle – and that’s about all. It doesn’t say anything about the capability of that boom at other angles,” Promersberger said.

Chris Barnes, derrick marketing manager for Altec (www.altec.com), an aerial equipment manufacturer and service provider for the electrical utility market, agrees. “The term is essentially meaningless today because there is virtually nothing you can pick up that close to the derrick. The truck and the outriggers [stabilizer legs] get in the way.”

Capacity at 10-Foot Radius
Realizing the limits of maximum capacity as a useful metric for selecting a derrick, the industry developed a new measure in the 1980s – capacity at 10-foot radius – to provide deeper insight into a derrick’s real-world capabilities. It defines how much weight the derrick can lift when the load is 10 feet from the center of the truck.

“Ten feet became an industry standard because it was likely the minimum load radius that could be useful in real-world applications,” Barnes explained.

But when comparing derricks based on the 10-foot rating, make sure the lifting capacity is the same from all boom positions, Barnes advised. “A derrick may have a higher capacity number when the boom is positioned to the rear of the truck than it would off the side, so you want to confirm with your manufacturer that you’ve accounted for any potential discrepancies.”

Sheave Height
A sheave (pronounced “shiv”) is the pulley at the tip of the boom. Therefore, “sheave height” is defined as the maximum height of the boom when it is fully extended and elevated, assuming a 40-inch frame height of the chassis.

“Sheave height impacts what size pole the derrick can lift and the machine’s optimal digging radius,” Barnes said. “This is especially important because the minimum and maximum digging radius is really the envelope in which your derrick will be operating much of the time.”

Although there is no universal rule on matching a derrick’s sheave height to pole height, Promersberger offered this general guideline: Select a sheave height that’s about two-thirds of the length of the pole you intend to lift and set. For example, if the pole is 90 feet high, you would spec a sheave height of about 60 feet.

Digging Deeper
While terms like “maximum capacity,” “capacity at 10-foot radius” and “sheave height” can help you narrow down the general requirements for your derrick spec, you’ll have to dig deeper into the details of your application to identify the specifications that meet the unique needs of your application.

So, as you evaluate your derrick requirements, keep these factors in mind:
• What size pole will the derrick be setting? Consider height, diameter and weight.
• What soil type will the derrick be digging? Will it be topsoil, sand, clay, limestone or another type?
• Will the soil be wet or dry?
• What equipment and gear will be hauled on the truck? How much will that cargo weigh at maximum load?
• What gross vehicle weight rating chassis will be required to meet derrick and payload requirements?

One online tool to help you dig deeper into the specifics of your application is Terex’s Work Zone Capacity Calculator (www.terex-calculator.com), which takes into account not only the derrick’s boom lifting capacity, but also the auger (drill) digging and lifting capabilities best suited for your needs.

Also, make sure you’ve covered all your bases by working closely with your derrick manufacturer throughout the specification process. They can walk you through the load capacity charts specific to their products to determine the machine’s capabilities at various load angles and sheave heights, to ensure the derrick is right for all aspects of your application.

High Stakes
When you consider that a typical digger derrick has a six-figure price tag, the stakes are high to get the spec right. Be crystal clear about the derrick’s job description and lean on your equipment manufacturer to help you align the derrick spec for the application to maximize productivity – and your return on investment.

About the Author: Sean M. Lyden is a nationally recognized journalist and feature writer for a wide range of automotive and trucking trade publications, covering fleet management strategies, light- and medium-duty trucks, truck bodies and equipment, and green fuel technologies. He blogs at Strategy + Writing (www.seanmlyden.com).

Nissan-NV-Full-Size-Cargo-Van-Web

Five-Point Checklist for Selecting the Right Service Van for the Job

The cargo van landscape has undergone an extreme makeover the last few years, providing more options than ever for utility fleet managers to consider when purchasing new vans.

In 2008, there was only one small van available in the U.S. – the Ram C/V Tradesman, a stripped-down version of the Dodge Caravan. But then came the Ford Transit Connect in 2009, with the Nissan NV200, Chevrolet City Express and Ram ProMaster City (expected 2015 model year) also entering the fray.

The full-size van market has also experienced a major transformation since 2008, when there were only three players: GM (Chevrolet Express/GMC Savana), Ford (E-Series) and Freightliner/Mercedes (Sprinter).

Today, there are five automakers in this segment, offering a much wider range of configurations and capabilities. Ram (formerly Dodge) recently re-entered the full-size segment with its ProMaster. Nissan launched its NV full-size van in 2011. And Ford is phasing out its traditional E-Series van in favor of the new high-roof, Euro-style Transit.

So, how do you sort through all the new options to select the right van for your fleet operations? Use this five-point checklist as your guide.

1. Payload Capacity
What equipment, parts, tools and products will the van be hauling? How much will that cargo weigh at maximum load? Your answer to the weight question will help you determine what size van you need (see “Van Classifications” sidebar).

As fuel costs continue to escalate, a growing number of fleets have been considering whether to move out of full-size vans and into more fuel-efficient compacts, like the Ford Transit Connect and Nissan NV200. But before you downsize, make sure that the actual payload is in line with the smaller van’s capabilities, cautioned Mike DeCesare, regional truck manager for ARI (www.arifleet.com), a full-service fleet management firm.

“Although very fuel-efficient, mini cargo vans are extremely easy to overload,” DeCesare said. “Where the fit is right, there could be tens of thousands of dollars in fuel savings, but companies would be wise to make sure that the van they select can actually do the job. Otherwise, a less expensive, more fuel-efficient van could end up being a very costly mistake if it’s not up to the task.”

2. Trailer Capacity
Will the van pull a trailer on a regular basis? If so, what will be the total weight of the trailer and its cargo at maximum load?

This is an important consideration because van manufacturer and engine selection are impacted depending on how much weight the van needs to pull.

Take one-ton vans, for example. The Chevrolet Express 3500 offers maximum trailer capacities of 7,400 pounds with a 4.8-liter V-8 gas engine, and 10,000 pounds with the 6.6-liter V-8 Duramax diesel engine, whereas the Ram ProMaster 3500 is limited to 5,100 pounds towing.

Both are one-ton vans, but there’s a wide gap in their towing capabilities. And even with the Chevrolet Express 3500, engine selection alone can make the difference of more than 2,500 pounds in trailer capacity. So, check the trailering guidelines for any of the vans you’re considering to confirm they can do the job.

3. Van Length/Wheelbase Options
How much space do you need inside the cargo area at maximum load?

If you’re considering a full-size van, you’ll have multiple wheelbase options to consider that impact cargo volume. For applications that require hauling pipe, conduit and other long materials inside the van, the extended wheelbase options give you that flexibility.

4. Roof Height Options
Will your drivers spend a lot of time working inside the cargo area of the van?

If so, the Euro-style full-size vans – such as the Ford Transit, Ram ProMaster, Freightliner Sprinter and Nissan NV – offer high-roof options, with cargo area heights above 6 feet, in some cases, that make it easier and safer for drivers to work inside the van without having to strain or bend down.

5. Gas vs. Diesel
Most full-size vans offer the option for gas or diesel. But with an upfront premium of $7,000 to $10,000 for diesel, how do you determine which is the best engine for the job – and your budget?

One factor to consider is the projected annual miles for the vehicle. “Since diesel tends to be more fuel-efficient than gas, the vehicle needs to travel about 40,000 miles per year to recoup the upfront investment in diesel through fuel cost savings within a reasonable time period,” said Don Scare, manager of truck excellence for fleet management firm PHH Arval (www.phharval.com), now part of Element Financial Corp.

In addition to better fuel economy, diesel also offers higher torque for towing and driving on mountainous terrain.

“The key question is, what’s the ROI? Because at the end of the day, you’re looking at about a several-thousand-dollar investment to go to diesel. The application needs to justify that higher investment,” Scare said.

Keep TCO in Mind
When it comes to proper van selection, “always keep total cost of ownership in mind,” advised Marcin Michno, business consultant, enterprise consulting and analytics for PHH Arval. “If you have a van that’s not spec’d correctly, then you risk driving up operating expenses [in terms of excessive repair and fuel costs] while diminishing resale value due to excessive wear and tear. In the end, choosing the right van with the right specification makes a huge difference in the total cost of ownership of that vehicle.”

About the Author: Sean M. Lyden is a nationally recognized journalist and feature writer for a wide range of automotive and trucking trade publications, covering fleet management strategies, light- and medium-duty trucks, truck bodies and equipment, and green fuel technologies. He blogs at Strategy + Writing (www.seanmlyden.com).

Van Classifications
Consider the four van classifications below and their corresponding payload capacities as you evaluate the optimal van size for your requirements.

Compact
Examples: Ford Transit Connect, Nissan NV200
Payload Capacity: 1,500-1,700 pounds

Half-Ton
Examples: Chevrolet Express 1500, Nissan NV1500
Payload Capacity: 2,300-2,500 pounds

Three-Quarter-Ton
Examples: Ford Transit-250, GMC Savana 2500
Payload Capacity: 3,000-3,300 pounds

One-Ton
Examples: Ram ProMaster 3500, Ford Transit-350
Payload Capacity: 4,000-4,600 pounds

Note: Although terms like “half-ton” and “one-ton” historically corresponded with actual payload capacity, today – as you can tell – that’s not the case. However, the industry has retained those terms as standard classifications for trucks and vans.

CLP1-Web

Worthwhile Investment

“Like many utility fleets, we have gone down the rebuilding path before and then moved away from it,” said Al Mascaro, fleet manager at Connecticut Light & Power Co. “Today, however, several key factors caused us to rethink our aerial replacement practices.

“There were economic and financial issues,” Mascaro continued, “such as the higher cost of new equipment and the relatively low residual value of used units. There were also changes in technology that have significantly improved equipment longevity and durability, including truck chassis and bodies that are favorable for rebuilding.”

Last, but certainly not least, Mascaro added, “We have the talent, tools and facilities to rebuild trucks and aerials in-house for less than half the cost of purchasing new equipment. The bottom line is that from operational and maintenance standpoints, we can have a boom going out that is better than when it came in.”

When the decision was made to embark on an in-house aerial rebuilding program at CL&P, Mascaro, a 32-year veteran of the utility, turned to the fleet’s highly qualified management personnel. Heading up the effort are Ronald Henne, transportation supervisor – Central Services, who has more than 33 years of fleet work experience, including 28 years at CL&P and 23 years as a supervisor, and Jack Deen, transportation supervisor – Aerial Overhaul Program, who joined the company after retiring from the U.S. Navy and has additional experience at Cummins and truck stop service facilities.

Selling Points
“One of the biggest selling points for this program,” Henne said, “is that we can rebuild aerials to reflect the latest designs and technologies. Everything manufacturers have developed and changed over time can be applied to the rebuilt units, from the turret to the bucket.”

The same philosophy, Mascaro noted, is applicable to the trucks’ chassis and stainless steel bodies. “We looked at our maintenance costs for a bucket truck in our fleet, which has a typical life cycle of 10 years, and realized we weren’t spending a lot of money on major components,” he said.

“Our specs and spending up front were designed for longevity, but we weren’t keeping trucks in service for a longer time,” Mascaro related. “With this program, we’re extending a 10-year life cycle to 17 years, which also frees up capital for customer reliability projects.”

The CL&P chassis in the rebuilding program are International 4400 models with DT466 engines and Allison automatic transmissions. Deen noted that to date, of the 61 trucks that have received rebuilt aerials, fewer than 20 percent – or about 10 to 12 units – have required powertrain rebuilds.

Partnership
Aerial equipment makers involved in the CL&P rebuilding program include Holan, Lift-All, Terex and Altec. “We work closely with suppliers and manufacturers to maintain a sufficient inventory of parts to support the rebuild program,” Deen said. “This partnership facilitates long-range planning and ordering of supplies before a truck is scheduled to be rebuilt.”

According to Deen and Henne, one challenging part of the process has been to stay ahead of changes among manufacturers, particularly aerial equipment companies that have merged or been bought out. “That is an ongoing issue, particularly for inventory control and engineering support,” Henne stated.

“Manufacturers are also key to making sure our technicians have the skills necessary to support the rebuild program,” Deen added. “Our suppliers helped technicians develop those additional skills through on-the-job training, including specialized skills associated with the aerial rebuilds which are done in-house, such as machining bushings from raw stock, custom fabrication of hydraulic hoses and rebuilding hydraulic cylinders.”

For completed rebuilt units, dielectric testing is handled for CL&P by Diversified Inspections/ITL, which is the same outside service provider that certifies the company’s aerials on a regular basis. In addition to dielectric testing, rebuilt units also have an acoustic emissions test performed in-house prior to being returned to service.

Under Mascaro’s direction, the CL&P fleet includes approximately 300 bucket trucks, 50 digger derricks, 500 Class 2 pickups and vans, 12 tractor-trailers, and a range of specialty and heavy equipment such as cranes and bulldozers. Specifications and purchases are handled by the Corporate Transportation operation headed up by Ron Thresher, manager at Northeast Utilities, CL&P’s parent company. The CL&P fleet is maintained by 80 technicians at 16 shops across Connecticut.

Exceeding Expectations
“There are always changes that can adversely affect equipment reliability,” Mascaro stated, “but we’re keeping tabs on every facet of our rebuilding program, and we are confident that it’s meeting and exceeding our expectations in every way. That not only includes financially, but in other very important ways as well.

“We could have outsourced this process very easily, and the numbers were very good either way,” Mascaro continued, “but we feel that performing this work in-house contributes to the program’s success. We have full faith in the skill of our staff, and our lineworkers feel the same way.

“Their confidence in this program was especially apparent this past January when we dispatched crews to help with storm restoration work in another state,” Mascaro concluded. “While the company selected the crews that would go out of state, the lineworkers chose the vehicles to take, and among them were two units from our rebuilding program.”

CL&P Truck Specifications
Model: International 4400
Wheelbase: 175 inches
Body: Reading ZAT148ADW Utility Body
Engine: International DT466 HT, 250 HP at 2300 rpm
Transmission: Allison MD3060P
Front Axle and Suspension: 12,000-pound leaf spring
Power Steering: TRW
Rear Axle and Suspension: 23,000-pound leaf spring
Brakes: Air
Wheels: 22.5-by-8.25 steel disc
Tires: 11R22.5 Michelin XZE

About CL&P: Formed in 1917, Connecticut Light & Power Co. is the state’s largest electric utility. Serving 1.2 million customers in 149 cities and towns, the company has a service area bordered by New York, Massachusetts and Rhode Island covering about 4,400 square miles. CL&P’s transmission network includes 1,625 miles of overhead transmission lines, 403 miles of underground cables and 19 substations. Its distribution network has 18,375 miles of overhead lines, 1,154 miles of underground lines and 212 substations.

CL&P is part of Northeast Utilities, New England’s largest utility system serving more than 3.6 million electric and natural gas customers in Connecticut, Massachusetts and New Hampshire. Sister companies include NSTAR Electric, Public Service of New Hampshire, Western Massachusetts Electric Co., Hopkinton LNG Corp., NSTAR Gas and Yankee Gas Services Co.

About the Author: Seth Skydel has more than 28 years of truck- and automotive-related publication experience. In his career, he has held editorial roles at numerous national business-to-business publications focusing on fleet and transportation management, vehicle and information technology, and industry trends and issues.

ETI-1-Web

Shedding Weight of Utility Fleet Upfits to Boost Payload and Productivity

New diesel emissions aftertreatment devices – including diesel particulate filters, selective catalytic reduction systems and diesel exhaust fluid tanks – have added considerable weight to medium- and heavy-duty truck chassis in recent years. This has contributed to a payload challenge for many fleet managers, especially for those utility fleets operating Class 7 and 8 digger derrick and aerial platform trucks. They’re looking to keep their trucks within a certain weight range to comply with federal bridge laws and, if possible, avoid having to bump up to a larger chassis that may require a federal excise tax.

A federal excise tax applies to the first retail sale of a truck with a gross vehicle weight rating of 33,001 pounds and above, adding 12 percent of the purchase price to the total cost of a truck. So, having to go to a bigger chassis could mean as much as a five-figure increase to the cost of each truck. Spread that added expense across an entire fleet, and you get the idea of the financial stakes at hand with truck weight.

How can fleet managers reduce overall vehicle weight without having to upsize the truck? One solution is to shed weight from the body and equipment that are mounted on the chassis, replacing conventional steel – where feasible – with advanced lightweight materials such as aluminum, fiberglass composites, plastic composites and thinner-gauge steel.

Lightweight Potential
Conventional steel is the predominant material used in truck bodies because of its relatively low cost and the comfort level that many fleet managers have with its strength and durability to hold up under rugged working conditions. But steel is also heavy, and replacing it with lighter-weight materials could offer substantial weight savings and increased payload capacity.

According to Joe Caywood, senior marketing and product manager for Terex Utilities (www.terex.com), a global manufacturer of aerial work platforms, using fiberglass and aluminum can reduce the weight of a line body, also known as a utility body, by about 38 percent. So, what impact does that make in terms of real-world payload?

Take, for example, a standard steel 156-inch line body, which weighs about 2,300 pounds, Caywood said. Reducing the weight of that body by 38 percent translates into an increased payload capacity of 860 pounds.

Then there’s lightweighting the equipment mounted on the body. Caywood said that Terex has been able to generate 15 to 25 percent weight savings in their aerial platforms and other equipment by incorporating some high-strength steel – which is thinner and lighter than traditional steel, but with comparable strength – in the company’s upfit designs.

A side benefit of some lightweight materials, specifically aluminum, fiberglass and plastics, is corrosion resistance, which is important for the longevity of upfits. They must be able to withstand the corrosive impact of road salt in the Snowbelt states and salt air in coastal regions.

“Many fleets evaluate body material selection based on the region where the vehicle will operate,” said Justin Chandler, body sales manager for Altec Inc. (www.altec.com), a truck equipment manufacturer and service provider for the electrical utility and telecommunications market that offers fiberglass and aluminum bodies as part of its Green Fleet product line. “Some fleets may use more fiberglass in a region that is an intense corrosive environment, whereas steel – which is less expensive – may work fine in a less corrosive environment. The key is to find the best material solution for each customer based on the factors most important to them, whether it’s weight, cost or corrosion resistance.”

Balancing Act
Since lightweight materials tend to cost more than steel, too much of an advanced material could drive up the cost to a point where it’s not financially practical. And then there’s the issue of material strength, which impacts body durability and performance.

“Generally, you want to stick with steel for the understructure of the body, especially in utility applications, because of the potential twist and torque of the body, whether the truck is going off-road or carrying a crane or an aerial device,” said Eric Paul, regional sales manager for ETI (www.etiequipment.com), a manufacturer of aerial lifts, mobile service cranes and custom bodies.

Where are the most appropriate opportunities for lightweighting the body while keeping costs in line and without sacrificing structural strength?

“You want to look at nonstructural areas in the body – the side packs [the side compartments in line bodies], doors, floor pan – any area of the body that doesn’t absorb a tremendous amount of stress,” Paul said. “Fleets may wish to also consider composite bushings and aluminum or composite shelving.”

Said Caywood, “Look for opportunities, such as wire holders or different components of the body for storage that can be made out of aluminum or other lightweight material. Even something as simple as redesigning to reduce the inches of weld in the body design can reduce weight.”

“Lightweighting is a big balancing act,” Paul said. “And when it comes to selecting lightweight materials for a body, there is no one-size-fits-all solution. There needs to be an engineering mindset about it. Recognize the physical properties of each of the various materials and strategically include the right mix of materials for the body to do the job it has to do.”

Reducing weight of upfits will help increase payload capacity, but not all lightweight materials are created equal or suitable for every situation. Therefore, when considering lightweight upfits, work closely with your body manufacturer and upfitter to select materials that best fit the application – and your budget.

About the Author: Sean M. Lyden is a nationally recognized journalist and feature writer for a wide range of automotive and trucking trade publications, covering fleet management strategies, light- and medium-duty trucks, truck bodies and equipment, and green fuel technologies. He blogs at Strategy + Writing (www.seanmlyden.com).

Daimler-2-Web

Spec’ing Medium-Duty Chassis for Utility Applications

Fleet managers dread receiving a call from an upfitter who says that the chassis delivered to their shop won’t work with the original body design and will require expensive changes to make it right.

At stake could be several thousand dollars to correct the issue and costly delays in vehicle delivery. And when you multiply that across five, 10 or 20 trucks ordered with the same spec, you get a clear idea of the potential financial fallout.

How do you reduce the risk of error when spec’ing a medium-duty (Class 4-7) chassis? Follow these four principles to write a chassis spec that’s suitable for the upfit – and the job.

1. Begin with the upfit in mind.
Whether it’s a digger derrick, an aerial platform or a service body with a crane, the upfit dictates what the chassis specs should be, said Mark Steffens, medium- and heavy-duty truck consultant at Donlen (www.donlen.com), a full-service fleet management company based in Northbrook, Ill., and wholly owned subsidiary of The Hertz Corp. (NYSE: HTZ). “So work closely with upfitters from the beginning because they can help you navigate potential pitfalls with the chassis, which are expensive to correct after it has been built.”

This is especially important because new diesel emissions technologies – such as diesel particulate filters, selective catalytic reduction systems and diesel exhaust fluid (DEF) tanks – added to medium-duty trucks in 2007 and 2010 have significantly reduced available frame rail space, requiring utility fleet managers to rethink fuel tank configurations, PTO locations and openings, exhaust systems and chassis lengths.

“A dual vertical exhaust was common in the past for many utility fleets, but it’s not really a good option these days with the addition of the DEF tank,” said William J. Byron, senior truck specialist, medium- and heavy-duty trucks, at Donlen. “You’ll find that many fleets are going to the horizontal exhaust because of the [frame rail] real estate issue.”

The use of alternative fuels also impacts upfit design, said Jim Palin, truck application engineer at GE Capital Fleet Services (www.gefleet.com), a leading full-service fleet management company based in Eden Prairie, Minn. “Extra battery packs [for hybrid-electric] or fuel tanks for propane or CNG could take up space on the frame rail, and the upfit will need to account for it. So, you may need to select a longer [cab-to-axle] chassis to allow for extra space,” he said.

2. Include a buffer with gross payload requirements.
What is the total weight of the body, the equipment mounted on the body and the expected cargo at maximum load?

Calculate that weight, also known as gross payload, and add a little extra to serve as a cushion. Byron suggests adding 2,000 pounds. Then select a chassis that offers the capacity to handle the maximum estimated payload, including a buffer. This way, you reduce the risk of overloading the truck, which could lead to safety concerns, a shorter life cycle, and premature maintenance and repairs.

3. Remember the trailer.
“Gas and electric utilities tend to use trailers a lot, particularly with their medium- and heavy-duty trucks, to pull backhoes, trenchers and other equipment,” Palin said. “But a common mistake fleet managers make is that they underestimate the weight of their trailer and the machine on it. We have to be very vigilant to get the make and model of the machines and an idea of any extra items that will be placed on the trailer so we can ensure the chassis is spec’d to the proper towing capacity.”

Will the truck pull a trailer? If so, how much does the trailer weigh? What will go on the trailer and how much will that cargo weigh at its heaviest load?

Once you’ve calculated these weights, make sure the chassis offers a sufficient gross combination weight rating – the maximum allowable combined weight of the truck and trailer at full loads – to support your towing requirements.

4. Account for terrain.
“The bulk of our utility clients want as many wheels turning as possible just because they have to deal with all types of environments, whether the trucks are on dry pavement, off-road, mud or snow,” said Mark Stumne, truck application engineer at GE Capital Fleet Services. “But if the truck isn’t going to be used off-road or on harsh terrain significantly, they’ll shy away from spec’ing four-wheel drive because it usually adds about $20,000 to those trucks.”

Palin said that terrain also impacts fuel tank selection. “If you’re going off-road, a key issue is ground clearance, especially with Class 6 to 7 trucks. In these cases, we recommend selecting shallow fuel tanks versus deep tanks, which can hang too low.”

Another consideration is gradeability, or steepness, of the terrain, Steffens advised. “Will the truck operate in the Rocky Mountains or in areas where it’s flat? Spec the optimal powertrain combination of engine horsepower and torque, transmission, and drive-axle ratio to ensure the truck has the power to get off the starting line with a heavy load and handle steep grades.”

What is the horsepower sweet spot for diesel engines in utility fleet applications? Byron offered this rule of thumb: “If it’s a severe-duty vehicle, anywhere from 275 to 330 horsepower is widely acceptable.”

What about transmission selection? “If the truck operates primarily off-road, a manual transmission might be a good idea,” Byron said. “But you also have to take into consideration how many drivers you have for that vehicle. If you have multiple drivers, and they’re not skilled with a manual, the automatic transmission would be the better fit.”

The Bottom Line
When in doubt, seek input from your upfitter or fleet management company to ensure the medium-duty chassis you’re about to order fits the application. Taking a little extra time upfront to get the spec right will pay dividends in peace of mind and money saved down the road.

About the Author: Sean M. Lyden is a nationally recognized journalist and feature writer for a wide range of automotive and trucking trade publications, covering fleet management strategies, light- and medium-duty trucks, truck bodies and equipment, and green fuel technologies. He blogs at Strategy + Writing (www.seanmlyden.com).

Lyden-3-Web

Selecting Cargo Management Systems for Work Vans

A van’s cargo management system – which may include a partition, shelving, bins, drawers, reel holders, a ladder rack and other accessories – not only secures the payload to protect drivers from unintended projectiles, but also provides technicians with greater visibility and easier access to their tools and equipment. This translates into quicker turnaround on service calls, enhancing customer satisfaction and profit per job.

But with an array of cargo management options to choose from, how should fleet managers determine what’s best for their operations?

Utility Fleet Professional spoke with Bruce Jones, application engineer at GE Capital Fleet Services, a leading full-service fleet management company based in Eden Prairie, Minn., who recommended that fleet managers use these three principles to guide their cargo management selection process.

1. Fit the system for the job
What’s the van’s job description? What exactly will it be hauling? Where will that cargo – such as parts, tools or equipment – need to be positioned in the van for safe, quick and easy retrieval?

Jones used the example of a telecommunications fleet that typically configures one cargo management system for their installers and another for service vans.

“On the installation side of the business, you’re hauling new products and components, which tend to be bulky, preboxed from the manufacturer. So the cargo interior will likely be comprised of racks with large open shelves, while leaving enough floor space to stack and secure large product,” Jones said. “But service techs tend to stock their vans with smaller parts and components for repairs, requiring a cargo interior package that can house the small pieces in a way that’s easy to find and access. In this case, you’ll have interior shelving that may use a lot of dividers or plastic bins that can slide into and lock onto the shelves. Service vans will also have more parts drawers, which take the place of the large open shelves that an installation van might use.”

2. Allow for adaptability
While tailoring the cargo management system to the job is important, avoid over-customization, which could limit your ability to use the van for other purposes. “The marketplace is in constant flux and, more than likely, at some point in the life of the van, you’ll need to switch the application to get the most use out of the vehicle – and there’s no one out there that wants idle vehicles,” Jones said.

What’s a solution?

“If it’s a telecom fleet, consider using the same core shelving or system for both [installation and service] vans, but make it adaptable, where you can slide in plastic bins, use removable modules or install dividers onto the shelves for the service vans,” Jones said. “This way, if you need to convert the van for installation jobs, you can do it with minimal time, effort and cost.”

3. Spec with ergonomics in mind
Proper ergonomics can be achieved by configuring the cargo area of the vehicle in a way that protects workers from musculoskeletal disorders, which are caused by awkwardly lifting heavy items and performing repetitive, high-strain movements.

“The question to ask is: Do I really need to make my technician get inside the van? Anytime a technician gets inside a cargo van, you’re increasing your chances of something going wrong – a technician twists his back or hurts himself in some way,” Jones said. “Try to keep the heavier, bigger items closer to cargo doors so [technicians] can stand safely and grab whatever they need from outside the van.”

One option that Jones said is growing in popularity is spec’ing vans with dual sliding doors for both curbside and street-side access. “Some fleets will turn the shelving toward the street side of the van, facing the door, so that as you open that sliding door, there’s a shelving module where the most frequently needed items are easy to access. [Technicians] can just grab and go, without straining to get inside the van.”

Jones said that ladder rack selection also impacts ergonomics, especially with new Euro-style full-size vans entering the market – such as the Ford Transit, Ram ProMaster and Mercedes Sprinter – with high-roof configurations that can make it difficult for workers to reach and safely load and unload a ladder from the top of the van. In these cases, consider a drop-down-style ladder rack, which is mounted on the roof and lowers to a level where the ladder can be easily loaded and unloaded, and then raises to its secure travel position, with minimal effort for the driver.

Another option is an interior ladder rack, ideal for stepladders up to 6 feet, which is ceiling-mounted inside the van’s cargo area, eliminating the need for drivers to reach up to the roof to grab that ladder. “But keep in mind, this will impact the interior height of the van. So if the technician needs to go inside the cargo area, then you have to deal with an object that he can bump his head on,” Jones said.

The Bottom Line
When it comes to cargo management systems for vans, one size does not fit all applications. Work closely with your van upfitter to lay out the shelving, bin and ladder rack configurations in a way that protects your drivers from injury, makes it quicker and easier to retrieve the parts and tools they need for the job, and ultimately enhances their productivity.

About the Author: Sean M. Lyden is a nationally recognized journalist and feature writer for a wide range of automotive and trucking trade publications, covering fleet management strategies, light- and medium-duty trucks, truck bodies and equipment, and green fuel technologies. He blogs at Strategy + Writing (www.seanmlyden.com).

  • 1
  • 2
Utility Fleet Professional

360 Memorial Drive, Suite 10, Crystal Lake, IL 60014 | 815.459.1796

KNOWLEDGE, INSIGHT & STRATEGY FOR UTILITY FLEET LEADERS

Utility Fleet Professional is produced by Utility Business Media, Inc.   View Capabilities Statement

Get the Utility Fleet Professional Digital Edition App

Get the iP Digital Edition App


© All rights reserved.
Back to Top